Your cart is currently empty!

by Wayne
I first developed an interest in photography as a teenager when my father gave me his Olympus rangefinder. When I moved to the UK I studied Photography for my A-Level; the school had a darkroom and for me it was a fascinating place – it was satisfying to see images magically appear on paper when placed in the developer.
I bought a digital camera in the early 2000s when they became popular, it is a much faster and more economical way of making images, and yet for me the magic is no longer there when images can be created so easily on a digital sensor and yet deleted so casually on a hard drive.
Two years ago I bought an old 35mm film camera, this reignited my interest in photography. I like the simplicity of the manual controls, one only needs to set the shutter speed, aperture, and focus to take a photograph. I then started to work backwards, thinking about simplifying what I want for a camera further, down to the bare essentials: a light-tight box with a hole on one end and light sensitive material (photographic film) at the other.
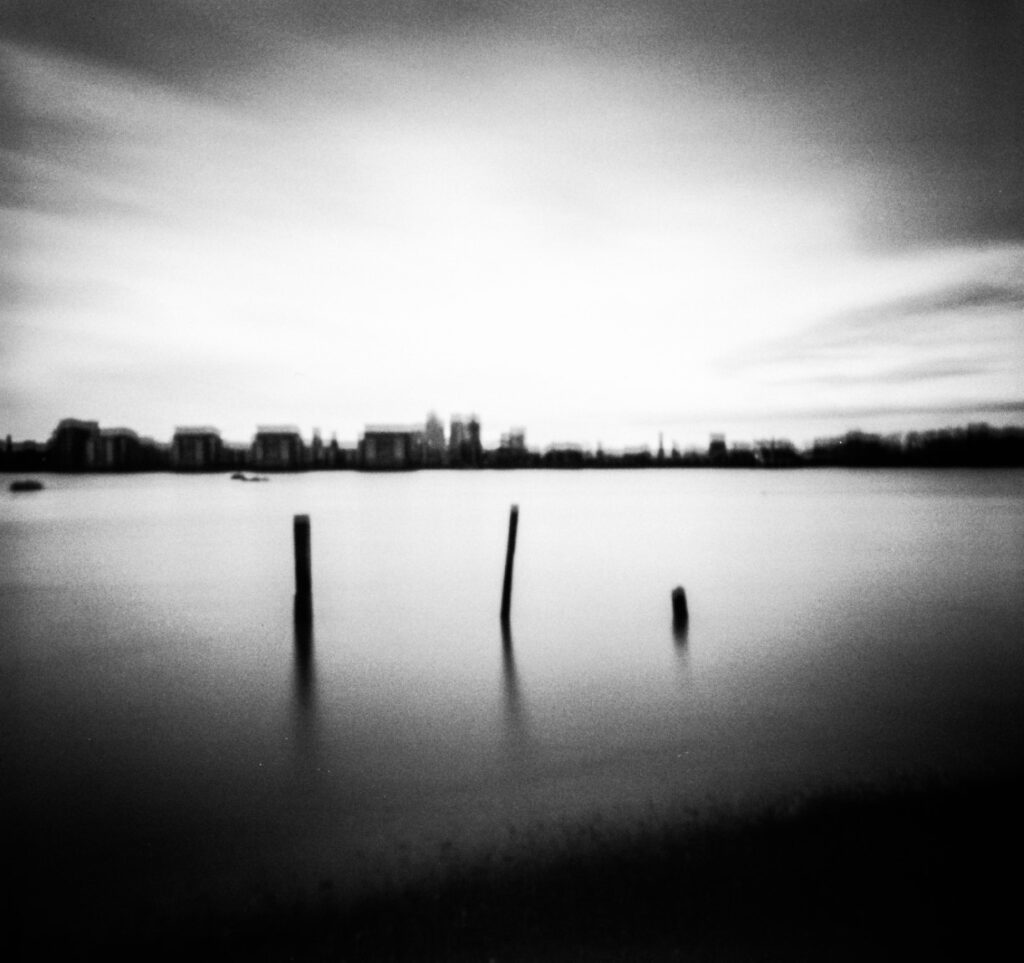
I like the “rawness” of the images pinhole cameras produce, and, as every homemade pinhole camera is a unique one-of-a-kind creation, I thought if I make my own camera it will produce some unique images that no mass produced digital camera can replicate. I also wanted to explore the characteristics of pinhole photography itself – what kind of images it would create – for example having such a large depth of field, and a very wide angle of view.
I started out by first choosing the format of film I wanted to use. I think 120 roll film is the easiest to work with, as one can easily take a used 120 spool and use it as a makeshift take up spool, and the frame number marking on the backing paper can be used to keep track of shots taken directly with a simple window made with red plastic sheet.
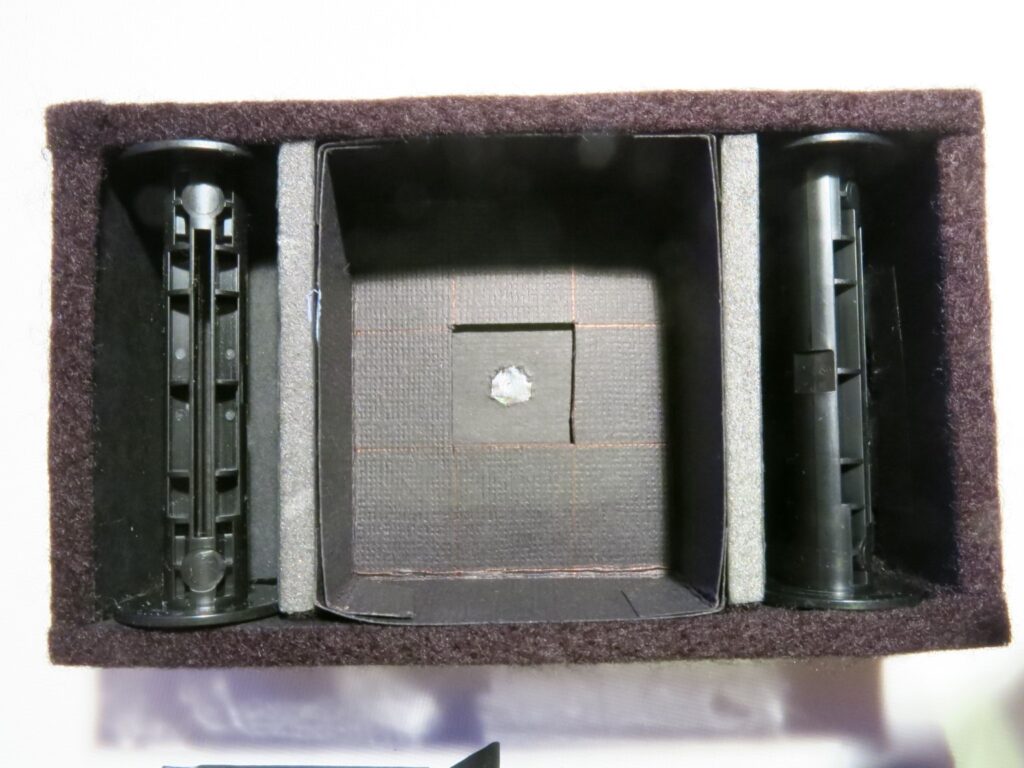
I used the website Mr Pinhole for calculating the size of the pinhole, and assume it uses a formula similar to the one developed by Joseph Petzval. I was planning to make a fairly compact camera with a standard medium format 6cm x 6cm exposure area, so I decided on using 30mm as my focal length (quite wide – a normal focal length would be about 75mm). Plugging these parameters into the pinhole camera design calculator gave me a pinhole size of 0.23mm at f130, with an angle of view of 109.5 degrees, with an image coverage diameter of 57.6mm, which should be fine for a 6×6 image size with just a bit of vignetting. The fairly wide angle of view should allow some interesting study of wide angle effects.

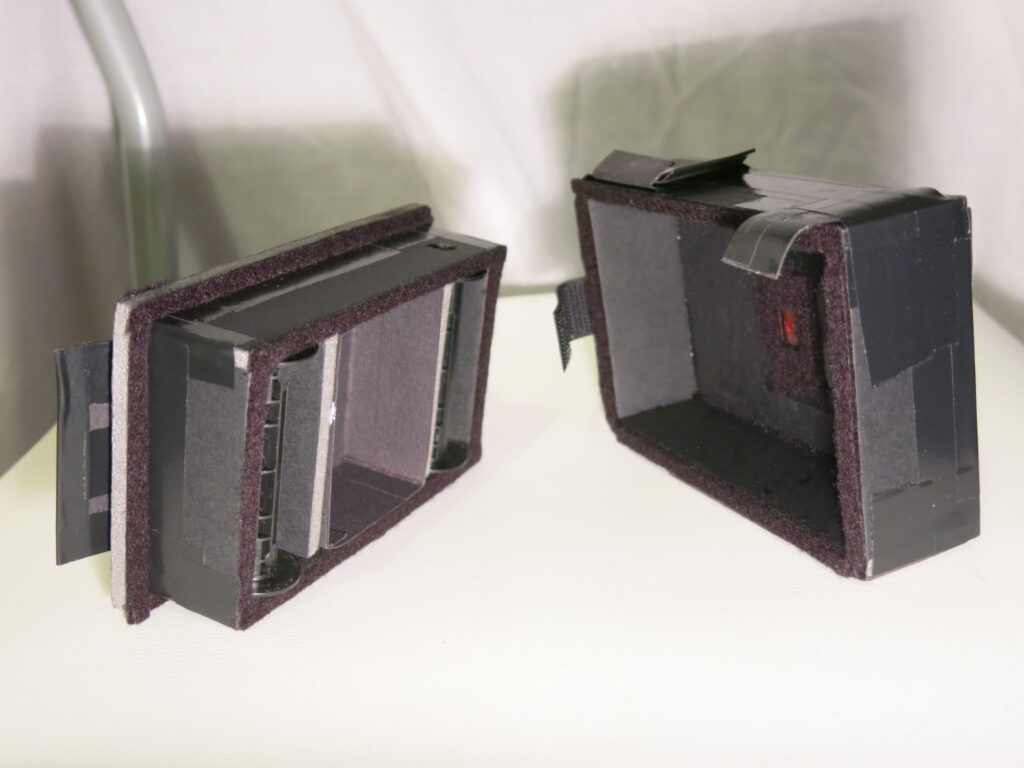
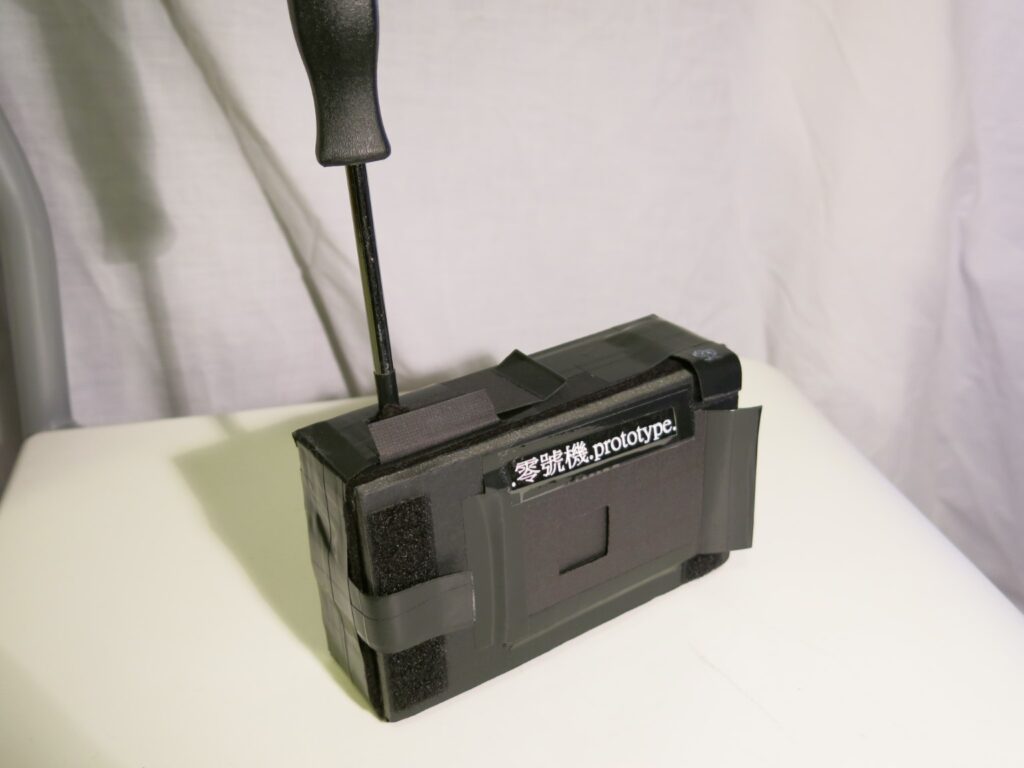
The focal length, and the dimension of the 120 film spool (allowing one supply spool and one take up spool), formed the basis of the camera dimensions.
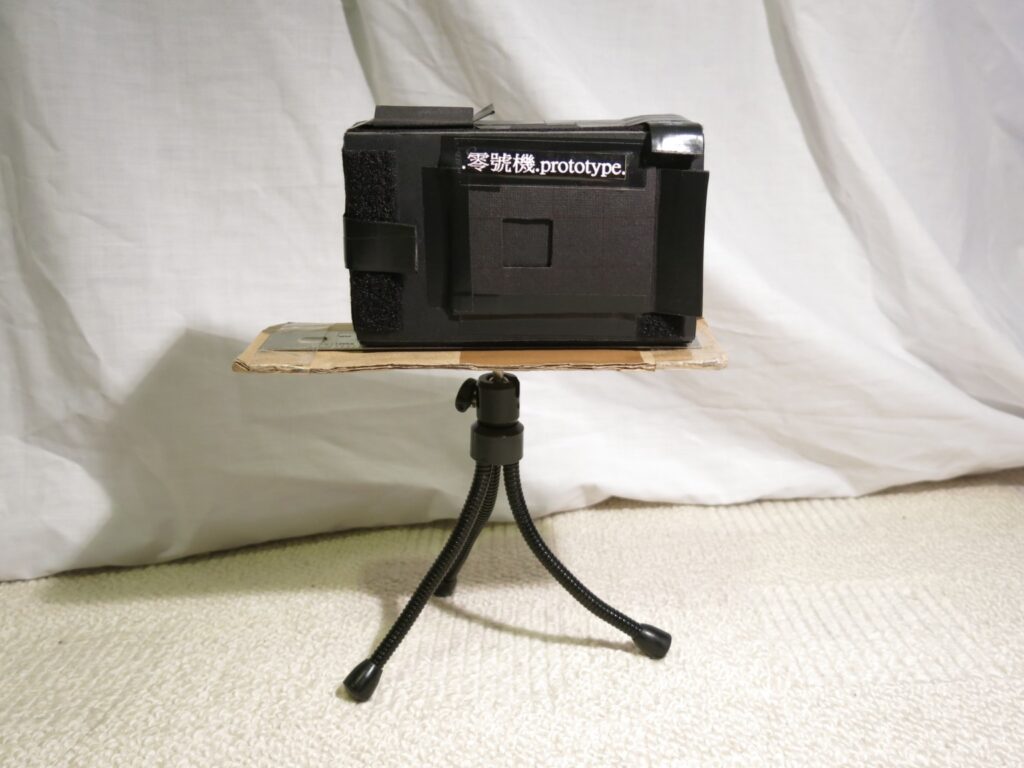
The main construction material I used was a sheet of 5mm thick paper foam board which is a kind of cardboard with dense polystyrene foam in the middle to give it more strength. The cardboard was cut into pieces of required size, and I used UHU glue to join the pieces together.
For the pinhole itself I cut a small sheet of aluminium foil and used the smallest sewing needle I could find to poke a hole in it. The hole itself was rather larger than the intended 0.23mm (more like 0.4mm) but it was the best I could do!
I used craft felt fabric and generous amount of black electrical tape for light-proofing the camera. The shutter control was a sliding door out of black paper card. As for the film advance mechanism, I left a small hole on the top of the camera that allows me to insert a small screwdriver into the end of the take up spool chamber in order to rotate it.
For judging exposure time based on my pinhole size, I used a look-up table in combination with a Sekonic L-308S exposure meter. The look-up table is from Mr Pinhole’s website, using f/100 (a guesstimate, since my pinhole was a bit bigger than the designed f/130). I printed the table out and carry it with me.
I wanted and easy to use and forgiving film with a lot of latitude for my pinhole images, so chose Ilford HP5+. The reciprocity failure curve for this film is well documented on Ilford’s website so I could incorporate it in my exposure lookup table. I processed the films myself at home using Ilford LC29 developer at 1+19 dilution. For HP5+ at ISO 400, development time was 6.5 minutes at 20C. After processing the negatives were scanned into digital files with a flatbed scanner, a Canon CanoScan 9000F mk2, and output to TIFF format. Finally, I adjust these TIFF files for contrast.
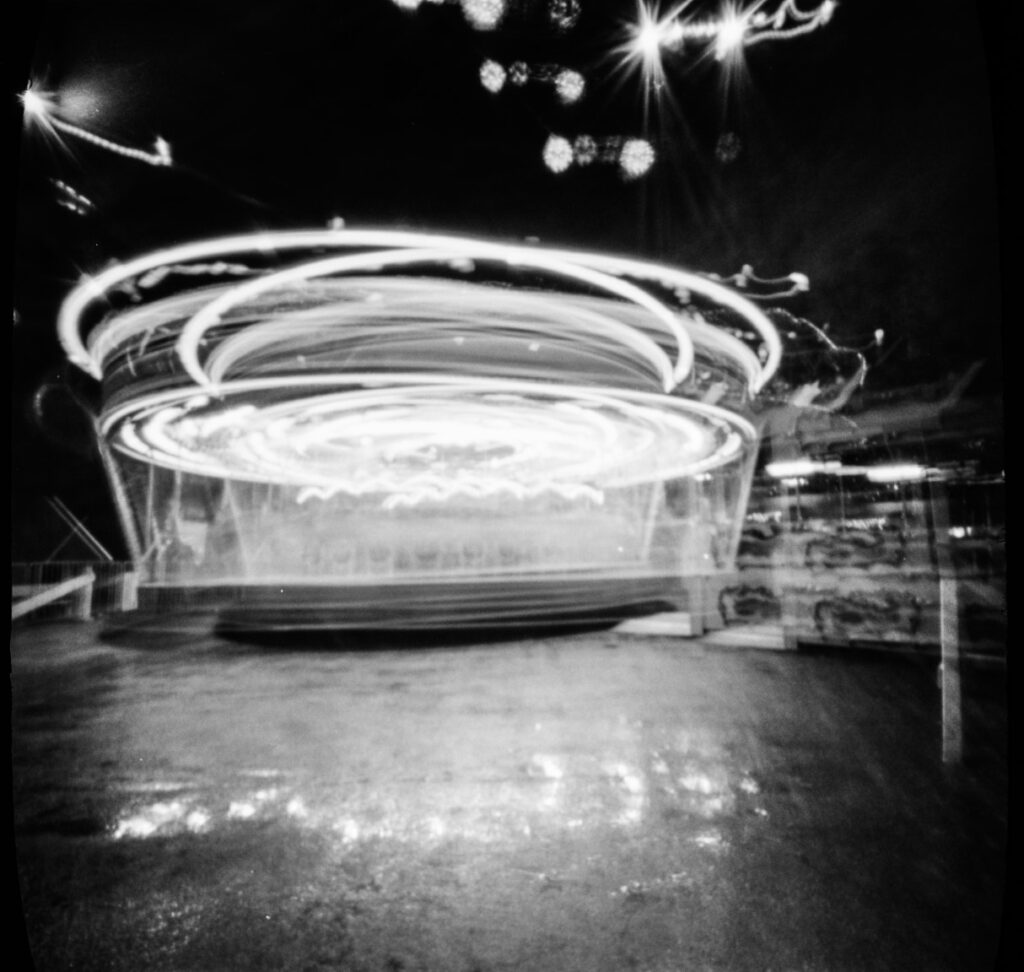
For me the three main distinctive characteristics of my pinhole camera are large DOF but with a soft image, wide-angle of view due to short focal length, and the effect of long exposure due to a small f-stop.
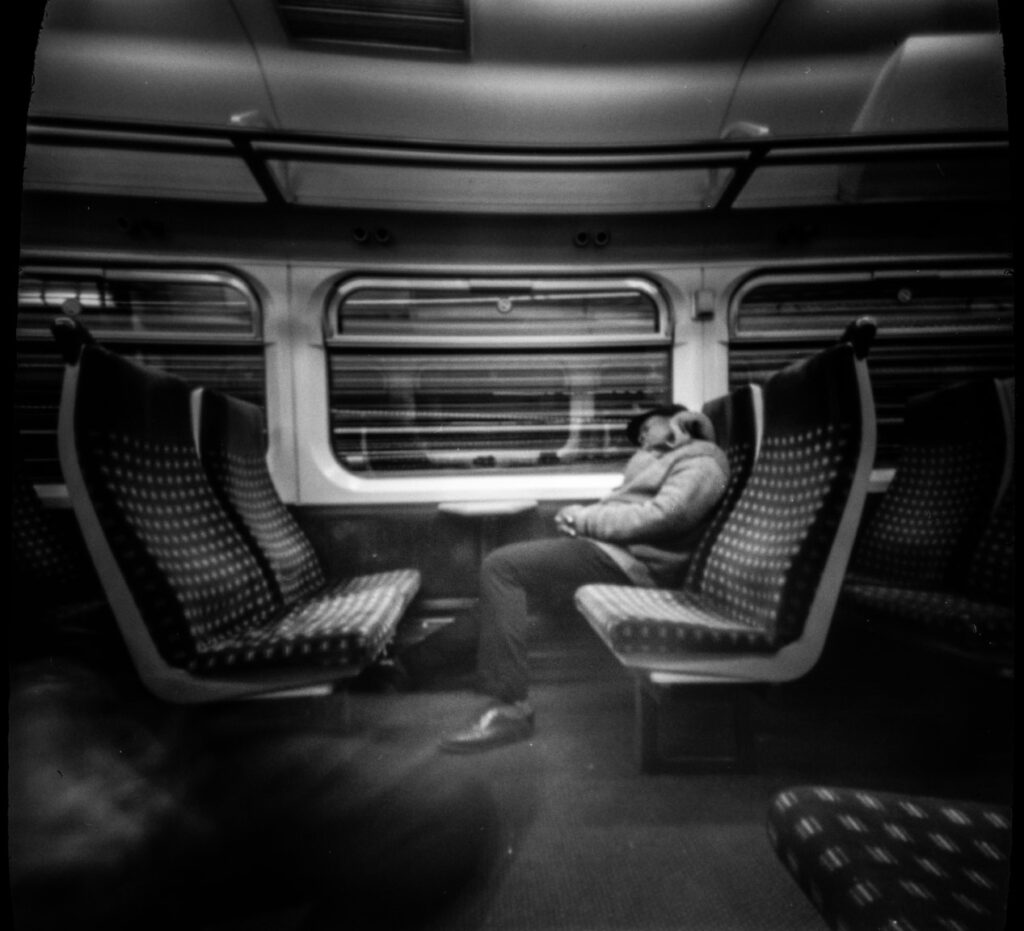
I usually tried to find subject matter that can incorporate all three characteristics. For example, in the image of a sleeping train passenger, I tried to use the wide angle effect to exaggerate the size of the seats, and passing lights outside the window turned into lines because of a long (15 minutes!) exposure. It is interesting to see the person has not moved at all during the exposure!
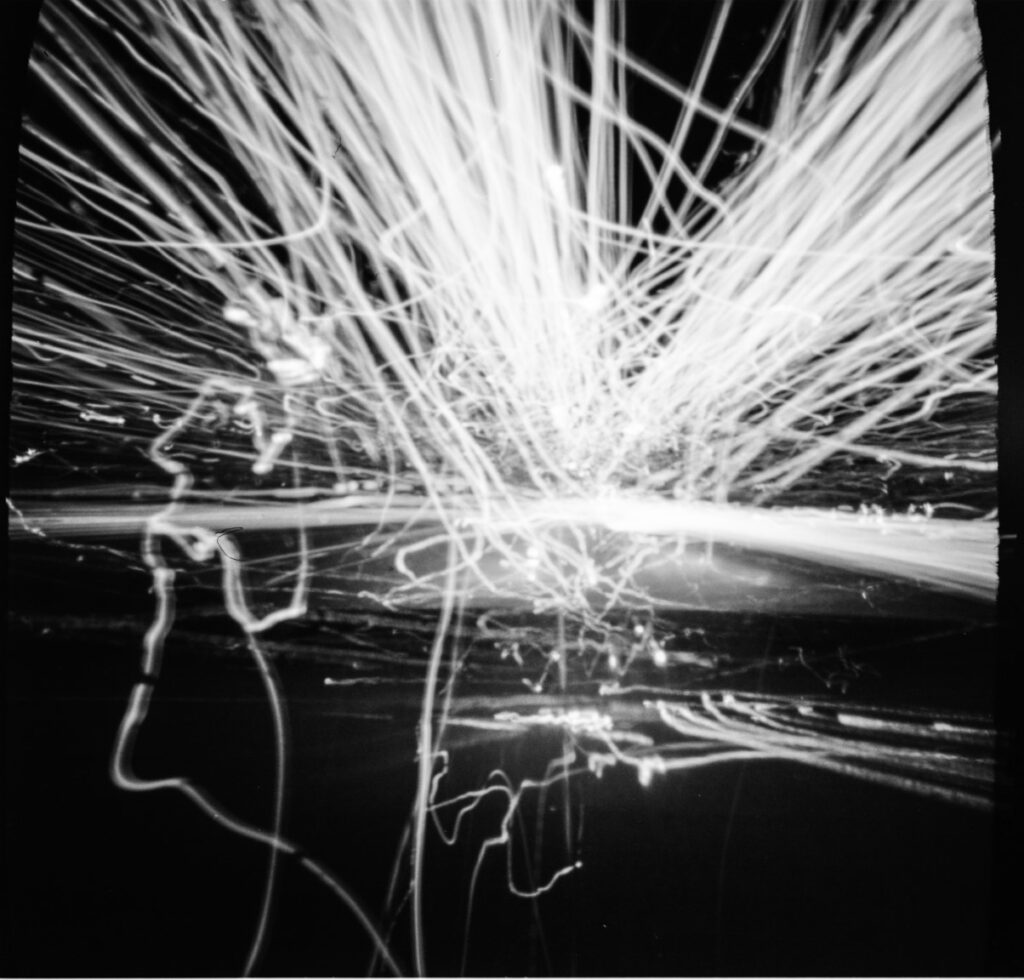
Another shot I find interesting was taken when I was driving at night. I placed the camera in the front of the dashboard and just let it record the whole 20 minutes trip, with street lights and headlights from other cars flying past. I didn’t know what the image would look like, which is part of the fun of taking photographs with the pinhole camera – the results are only seen after processing the film.
After experimenting with pinhole photography and going back to film, I find myself slowing down more in the picture taking process, and I think also making better pictures. I am enjoying photography again and I think all photographers should give film a try once in a while to experience something that has a long history behind it.